Blog
Build Your First MCP Server with TypeScript
December 11, 2024 - Roy Derks
If you're building AI agents, you've probably heard of MCP (short for "Model Context Protocol"), a new open-source protocol for connecting agents to your data. MCP was created by Anthropic as an open specification, now being adopted by many tech companies. This tutorial will guide you through setting up your first MCP server using TypeScript. By the end, you'll be ready to build and connect tools to an MCP host like Claude Desktop.
What You'll Learn:
- Install and set up an MCP server with TypeScript
- Define custom tools for your MCP server
- Execute tools using the MCP protocol
- Integrate your MCP server with a host such as Claude Desktop
Click the image below to watch the YouTube video version:
 VIDEO: Build Your First MCP Server in TypeScript
What is MCP?
The Model Context Protocol (MCP) simplifies the process of enabling AI agents to interact with various tools. MCP consists of three main components:
- MCP Servers: These act as bridges to connect APIs, databases, or code. They expose data sources as tools to the host and can be built using Python or TypeScript SDKs.
- MCP Clients: These clients use the protocol to interact with MCP servers. Like servers, they can be developed using SDKs in Python or TypeScript.
- MCP Hosts: These systems manage communication between servers and clients, ensuring smooth data exchange. Popular hosts include Claude Desktop, Zed, and Sourcegraph Cody.
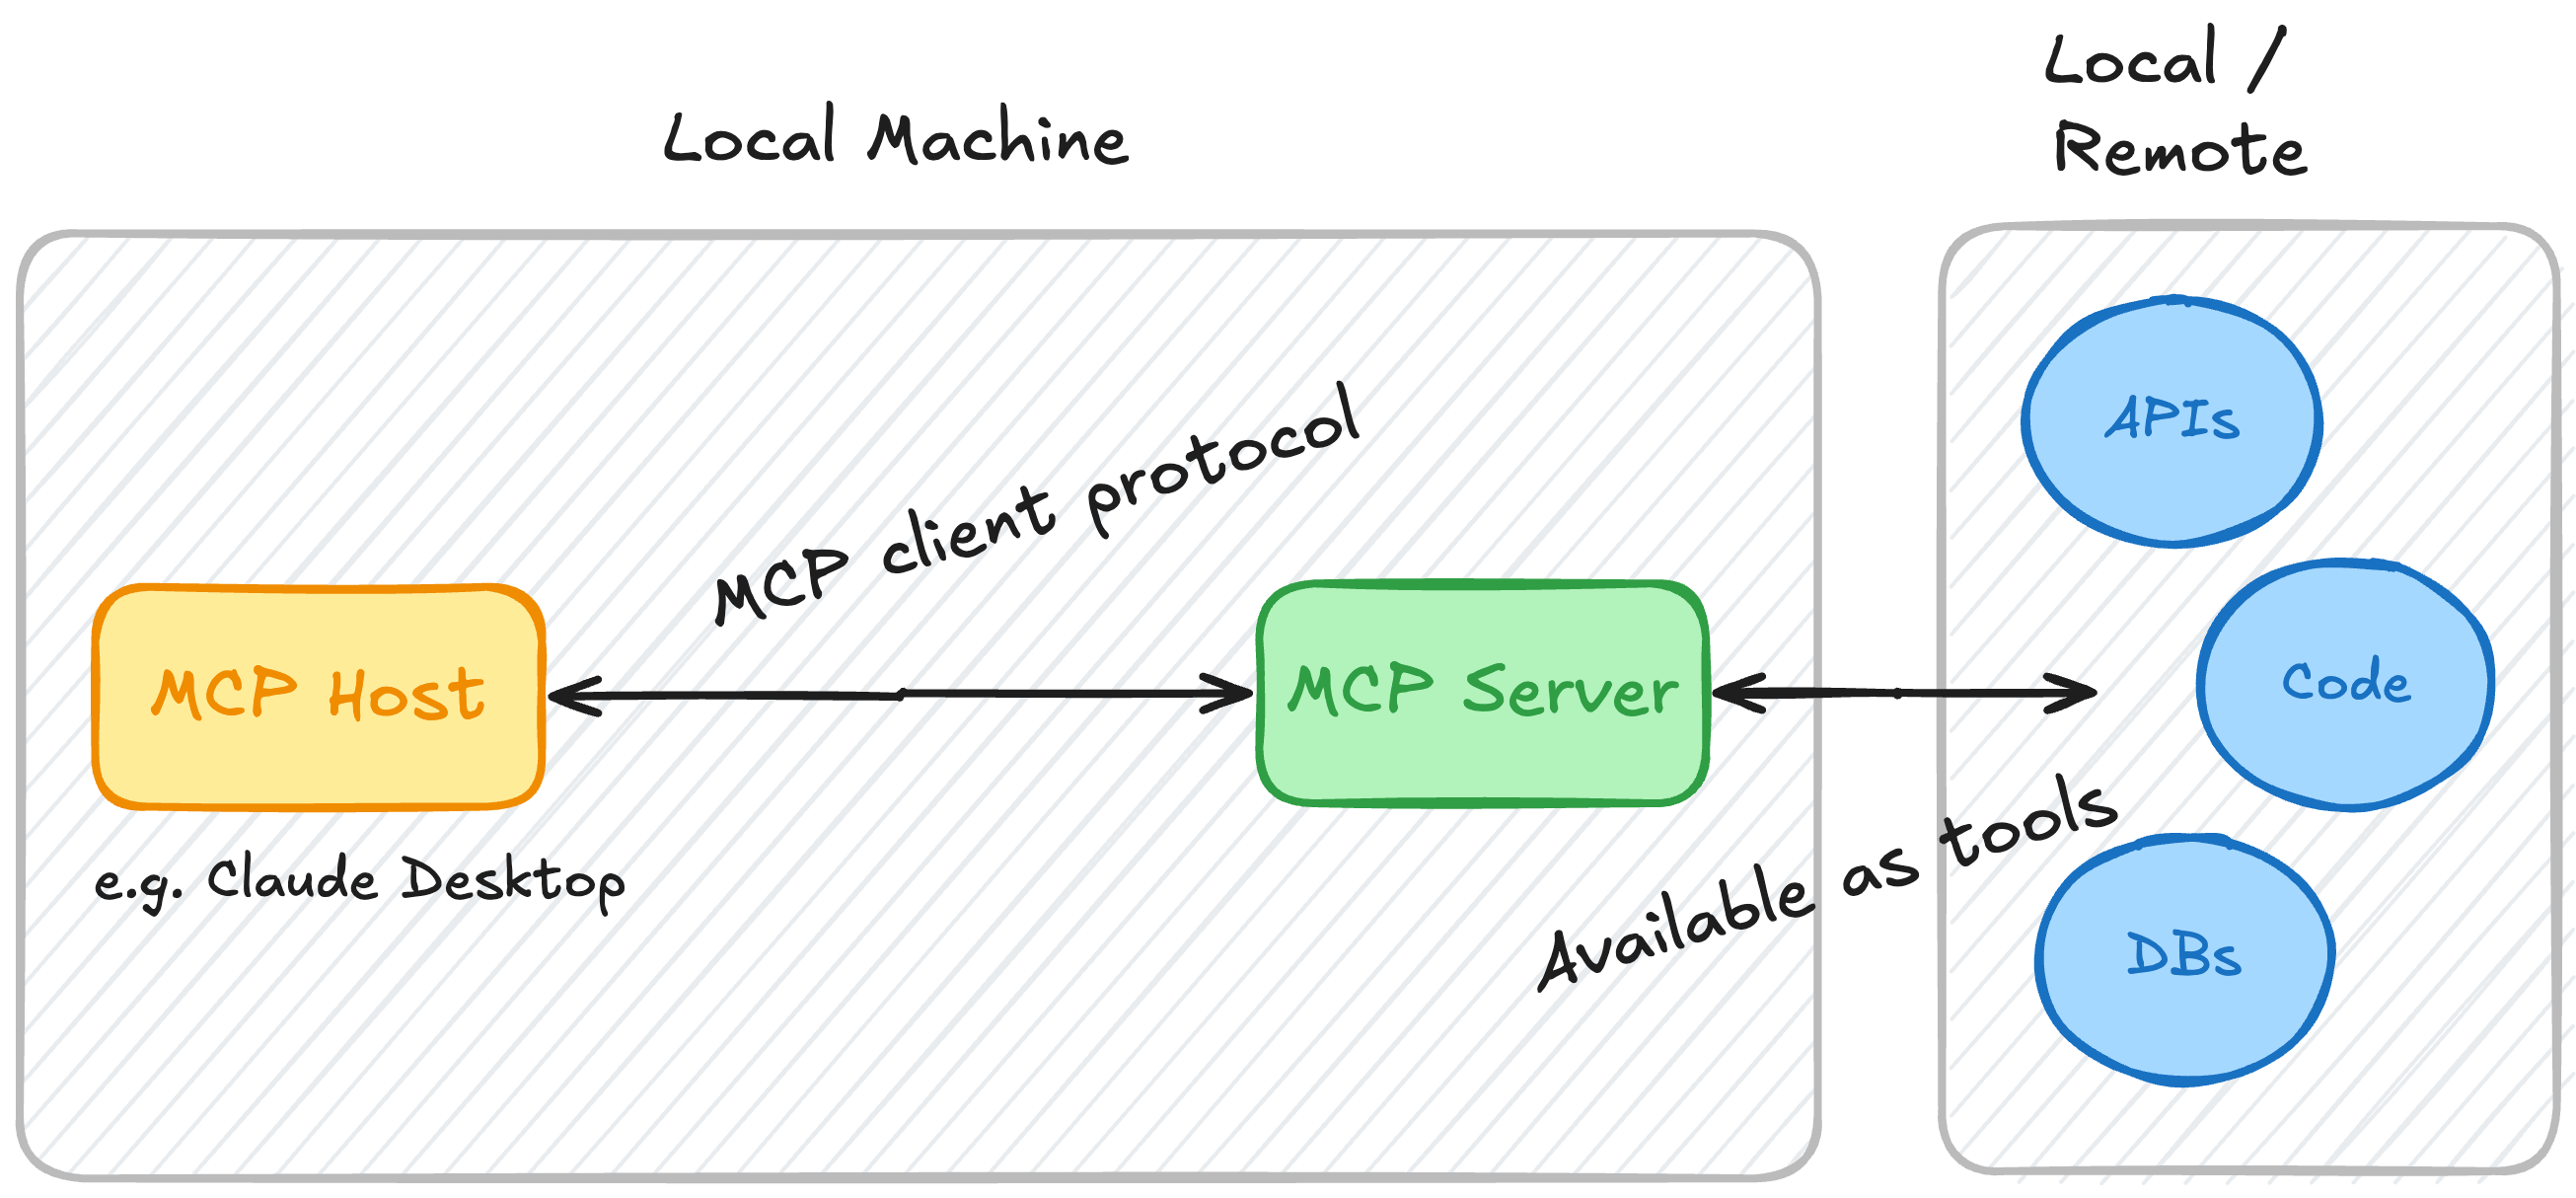 MCP server diagram
The tools provided by an MCP server can be accessed via any MCP host, allowing developers to connect AI agents to new tools without the need for custom integration code.
Setting Up an MCP Server
In this tutorial, we'll focus on building an MCP server using the TypeScript SDK. We’ll use Claude Desktop as our host for testing.
Step 1: Install Dependencies
Begin by creating a new project and initializing an npm package. Add the necessary dependencies for the MCP server and TypeScript. Ensure your project includes configuration files like package.json and tsconfig.json:
mkdir mcp-server
cd mcp-server
Create a package.json file:
{
  "name": "mcp-server",
  "version": "0.1.0",
  "description": "A Model Context Protocol server example",
  "private": true,
  "type": "module",
  "bin": {
    "mcp-server": "./build/index.js"
  },
  "files": [
    "build"
  ],
  "scripts": {
    "build": "tsc && node -e \"require('fs').chmodSync('build/index.js', '755')\"",
    "prepare": "npm run build",
    "watch": "tsc --watch",
    "inspector": "npx @modelcontextprotocol/inspector build/index.js"
  },
  "dependencies": {
    "@modelcontextprotocol/sdk": "0.6.0"
  },
  "devDependencies": {
    "@types/node": "^20.11.24",
    "typescript": "^5.3.3"
  }
}
Create a tsconfig.json file:
{
  "compilerOptions": {
    "target": "ES2022",
    "module": "Node16",
    "moduleResolution": "Node16",
    "outDir": "./build",
    "rootDir": "./src",
    "strict": true,
    "esModuleInterop": true,
    "skipLibCheck": true,
    "forceConsistentCasingInFileNames": true
  },
  "include": ["src/**/*"],
  "exclude": ["node_modules"]
}
Run the following command to install dependencies:
npm install
Step 2: Write Boilerplate Code
Create a file src/index.ts and add the following boilerplate code:
import { Server } from "@modelcontextprotocol/sdk/server/index.js";
import { StdioServerTransport } from "@modelcontextprotocol/sdk/server/stdio.js";
import {
  CallToolRequestSchema,
  ErrorCode,
  ListToolsRequestSchema,
  McpError,
} from "@modelcontextprotocol/sdk/types.js";

const server = new Server({
  name: "mcp-server",
  version: "1.0.0",
}, {
  capabilities: {
    tools: {}
  }
});

server.setRequestHandler(ListToolsRequestSchema, async () => {
  return { tools: [] };
});

server.setRequestHandler(CallToolRequestSchema, async (request) => {
  if (request.params.name === "name_of_tool") {
    return {};
  }
  throw new McpError(ErrorCode.ToolNotFound, "Tool not found");
});

const transport = new StdioServerTransport();
await server.connect(transport);
Step 3: Define and Add Tools
Define a tool schema and its execution logic. For example, to add a tool that calculates the sum of two numbers:
server.setRequestHandler(ListToolsRequestSchema, async () => {
  return {
    tools: [{
      name: "calculate_sum",
      description: "Add two numbers together",
      inputSchema: {
        type: "object",
        properties: {
          a: { type: "number" },
          b: { type: "number" }
        },
        required: ["a", "b"]
      }
    }]
  };
});

server.setRequestHandler(CallToolRequestSchema, async (request) => {
  if (request.params.name === "calculate_sum") {
    const { a, b } = request.params.arguments;
    return { toolResult: a + b };
  }
  throw new McpError(ErrorCode.ToolNotFound, "Tool not found");
});
Step 4: Integrate with Claude Desktop
Register the MCP server in claude_desktop_config.json:
{
  "mcpServers": {
    "mcp-server": {
      "command": "node",
      "args": [
        "/Users/YOUR_USER/mcp-server/build/index.js"
      ]
    }
  }
}
Restart Claude Desktop to see the tools listed.
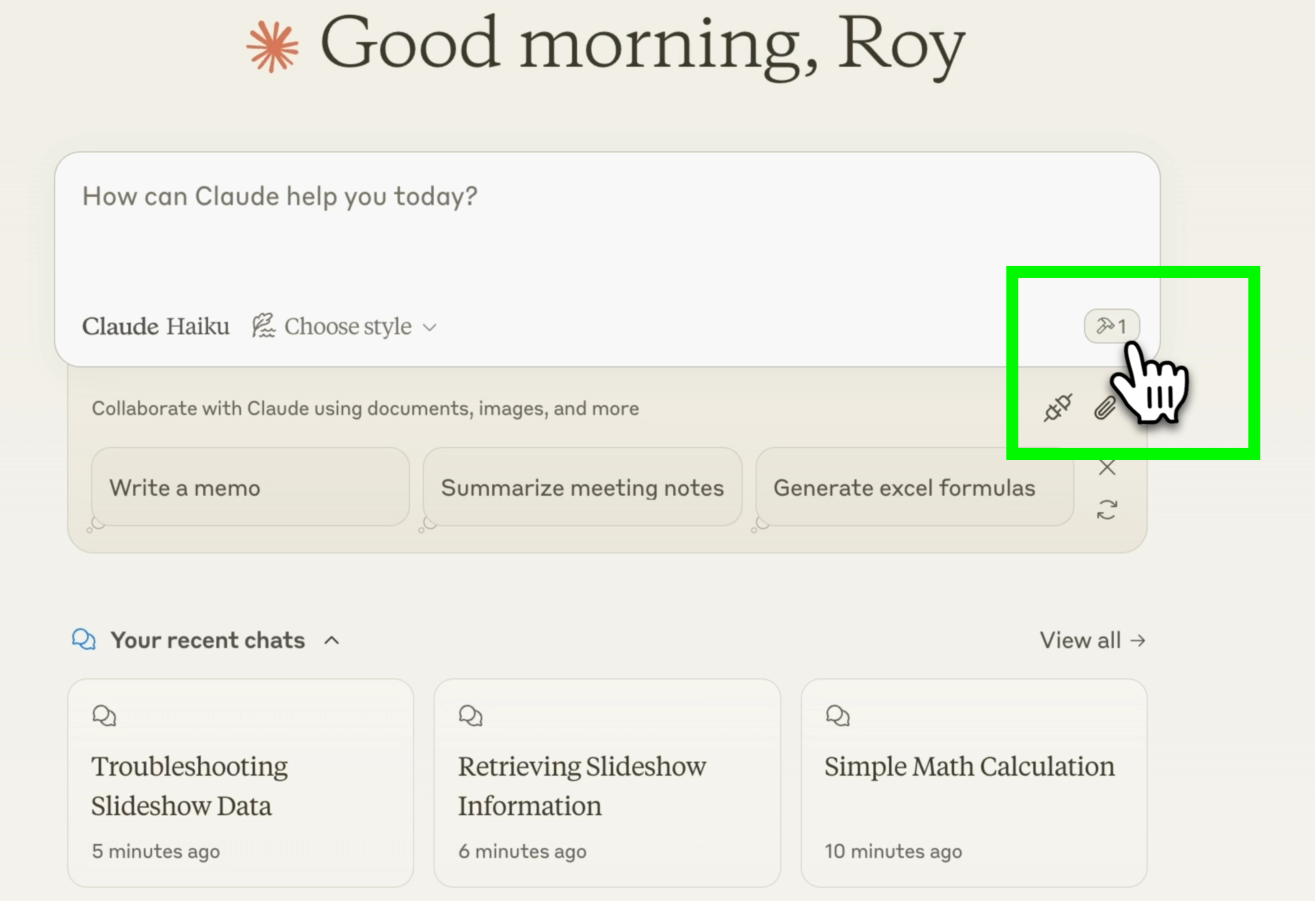 MCP server tools in Claude Desktop
You can click on the "tools" button to see the name and description of the available tools, including the MCP server that provided the tool:
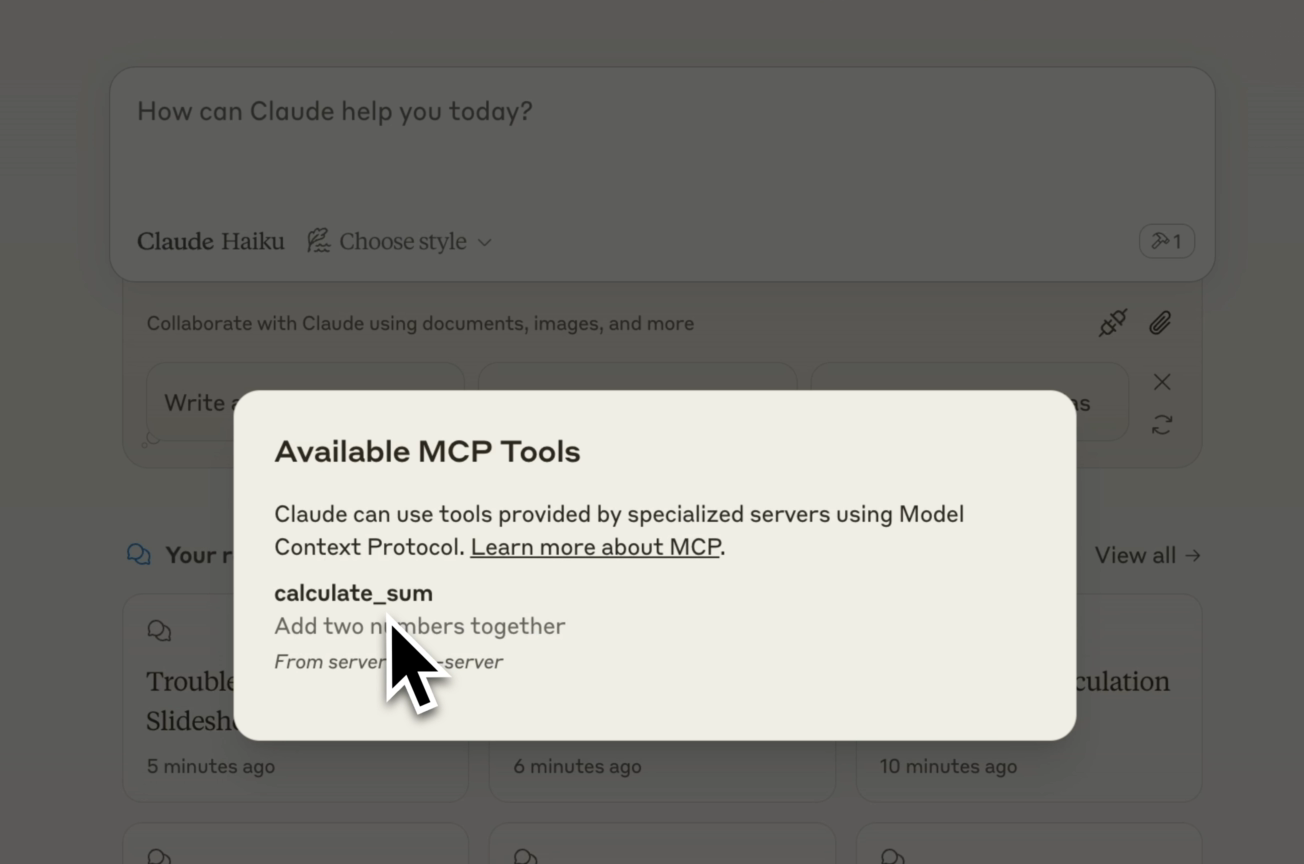 MCP server tool details in Claude Deskop
After verifying the MCP server and the tool are available, you can start asking a question that would trigger a call to the calculate_sum tool, such as:
What is the sum of 9999 + 1?
When you press "enter," it should start generating your answer. If a tool is found that matches your question, you will be asked to grant Claude access to call that tool. This process is called "human in the loop" and will prevent malicious tool calls:
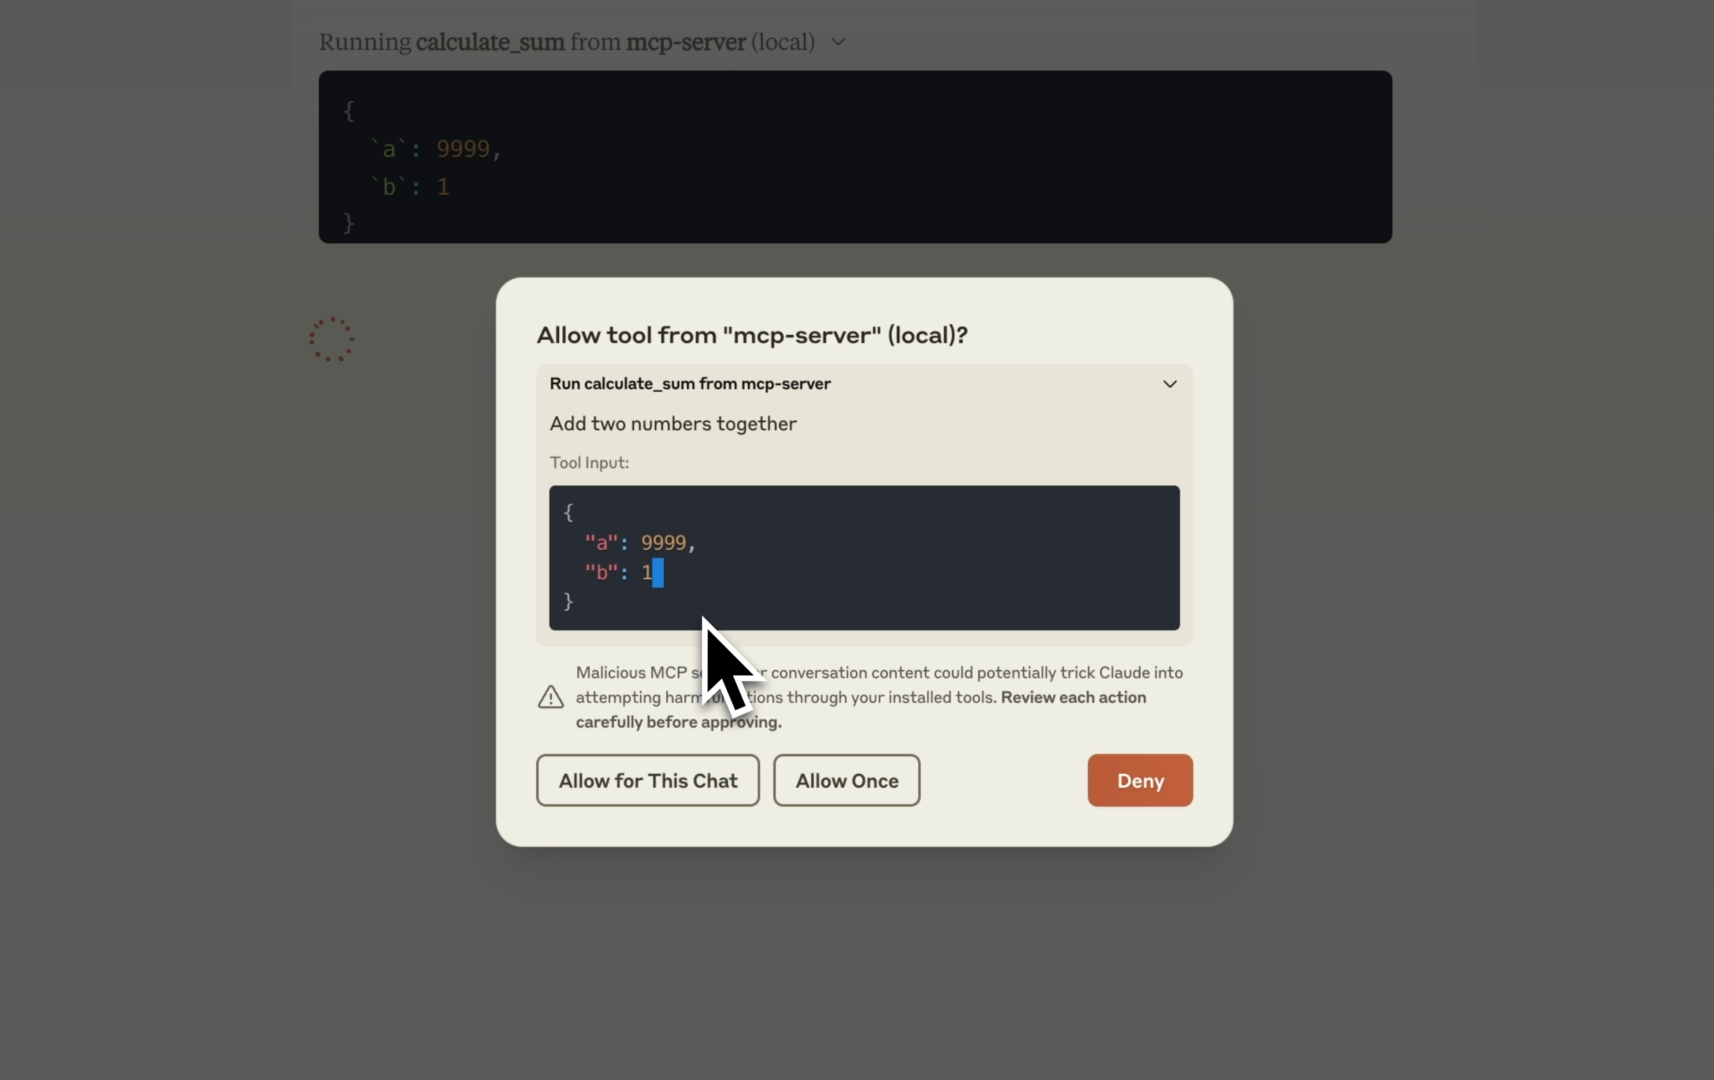 Tool use in Claude Desktop
If granted access, Claude will use the tool "calculate_sum" to add up the two numbers and print the result (which is 10000) in the chat.
4. Calling a REST API as a tool
Besides executing code in the MCP server, you can also retrieve remote data from a source such as an API. Let's use a mock REST API from httpbin.org that returns JSON data about a mock slideshow.
In the file src/index.ts you need to add the following code to define the tool:
// Define available tools
server.setRequestHandler(ListToolsRequestSchema, async () => {
  return {
    tools: [
      {
        // calculate_sum tool definition
      },
      {
        name: "httpbin_json",
        description: "Returns data about slide show",
        inputSchema: {
          type: "object",
          properties: {
            id: { type: "number" }
          },
          required: []
        }
      }
    ]
  };
});
As you can see in the video recording of this tutorial, I used Claude Desktop to generate the code to execute this REST API request. You need to add this code to src/index.ts too:
// Handle tool execution
server.setRequestHandler(CallToolRequestSchema, async (request) => {
  if (request.params.name === "calculate_sum") {
   // ...
  }
  if (request.params.name === "httpbin_json") {
    try {
      const response = await fetch('https://httpbin.org/json', {
        method: 'GET',
        headers: {
          'accept': 'application/json'
        }
      });

      if (!response.ok) {
        throw new Error(`HTTP error! status: ${response.status}`);
      }

      const data = await response.json();

      return ({
        toolResult: data
      })
    } catch (e) {
      throw new Error("Something went wrong");
    }

    throw new Error("Tool not found");
});
Once you've added both pieces of code, make sure to build the MCP server code again by running:
npm run build
You don't need to make any changes to the Claude Desktop configuration this time, as we did not update the MCP server but only the tools for this server. You do have to close and restart Claude Desktop, as otherwise it doesn't pick up the newly built code.
After restarting Claude Desktop, you should see that there are two tools available now, and you can ask a question like:
Give me more details about the latest slideshow
After pressing "enter" you'll be asked to give Claude access to the new httpbin_json tool:
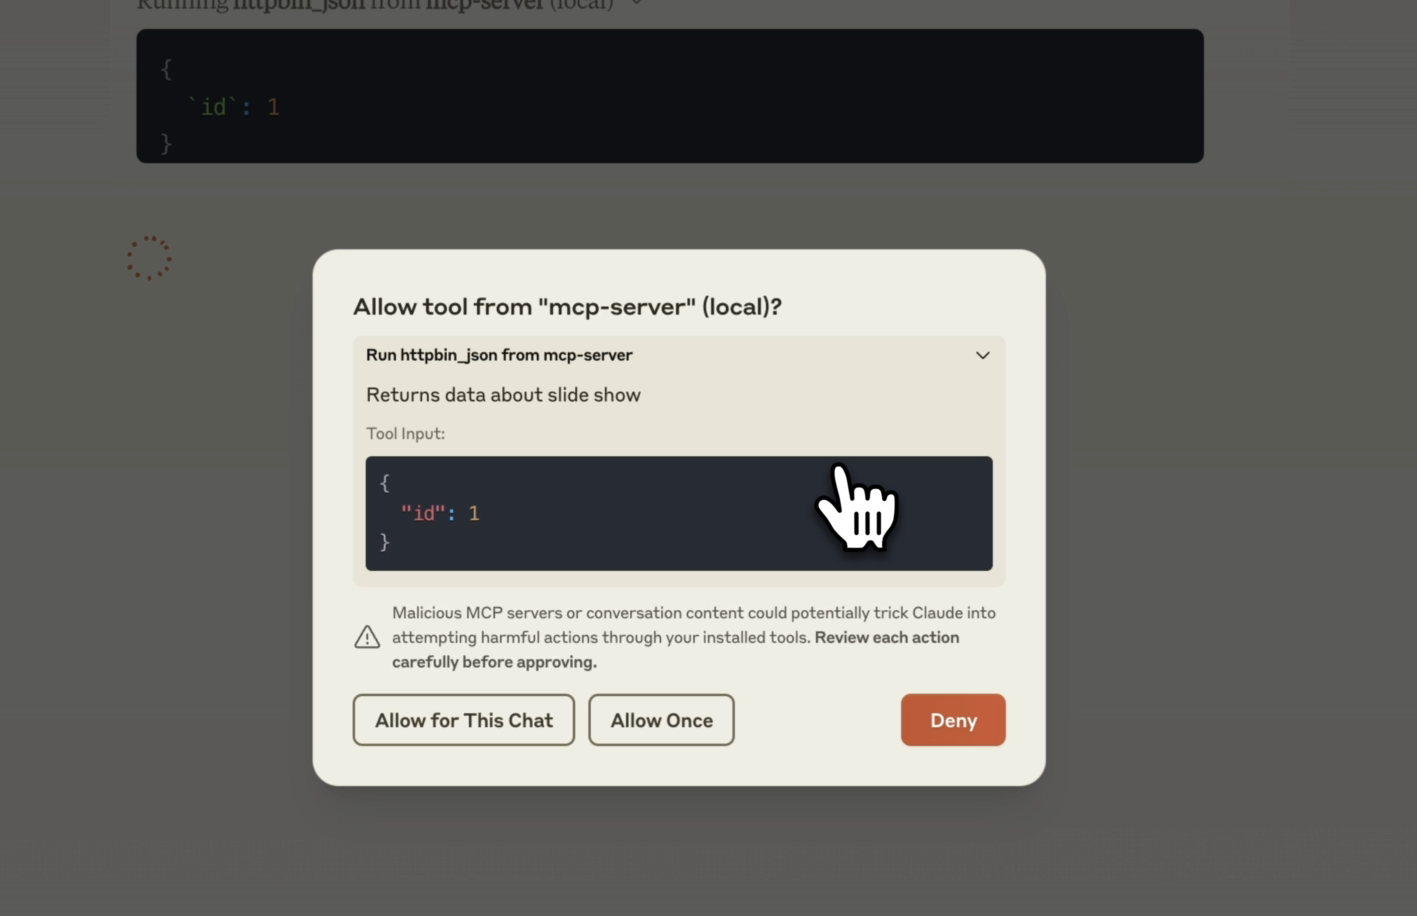 REST API as a tool in Claude Desktop
Once granted access, the MCP host will initiate a tool call to the MCP server. The MCP server will call the httpbin.org mock REST API and return the result back to the MCP host.
What's next?
he Model Context Protocol represents more than just a technical specification—it's a model for connecting your data sources to AI agents across different applications. While MCP simplifies integration, there are still areas where developers need to provide additional support, such as caching, authentication, and scalability.
One of the key next steps is to explore advanced integrations. For instance, combining MCP with a tool library or platform like IBM watsonx.ai Flows Engine can provide an even better tool development experience. This platform allows you to transform any data source into a tool and deploy it to a GraphQL endpoint. From there, tools can easily connect to AI agents or be integrated into MCP hosts.
If you found this tutorial helpful, don’t forget to share it with your network. For more content on AI and web development, subscribe to my YouTube channel and connect with me on LinkedIn, X or Bluesky.